- The Lost Art of the Hashishin The Workshop Part 1
- The Lost Art of the Hashishin The Workshop Part 2 – Science & Traditions
- The Lost Art of the Hashishin The Workshop Part 3 Ice Water Sieving
- The Lost Art of the Hashishin The Workshop Part 4 Ice Water Sieving
The main limitations of working with live material is getting direct access to the plants and an extremely small window of opportunity.
In part 1 of this workshop, we covered trichome formation, development, and function; in Part 2 we focused on traditional dry sieving techniques and the evolutionary advantages of using water. In Part 3, I shared the scientific evidence that gave me the ability to define and precisely separate the different dimensions of trichome head ripeness.
We will now cover the different plant material available – live plants, fresh or frozen, dried and cured, and the implications the forms of cannabis biomass used has on the ice water sieving.
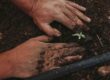
The Material
A Hashishin does not make quality; the land, the climate, the genetics and the dedication and knowledge of the farmers, the “terroir” does.
The Cannabis plant offers two pinnacles of quality; the first one is at harvest, at the peak of the flowering cycle, and the second is attainable only once the plants have been slowly dried over a two-week period before curing 3 to 9 months. The hand-rolled live resin collected at the feet of the Himalayas called Charas, and the dried and cured resin called Hashish produced in countries from Morocco to Afghanistan are the traditional concentrates expressing these two states of quality.
There are no terpenes that are unique to the Cannabis plant; Cannabis nonetheless produces unique terpene profiles. These aromas are made of hundreds of terpenes, many of them in such minute quantities that they are impossible to measure accurately. Cannabis terpene profiles are unique and inimitable and vital to the overall psychoactive and medicinal properties of the resin.
Live and Fresh Frozen Material
The predominant characteristic of terpenes is their extreme volatility. This creates an obstacle the Hashishin must deal with from the moment of harvest until the resin is pressed into Hashish and packaged.
If there is smell emanating from the plants, there is a loss of terpenes, a morphological activity of plants which starts at dawn and stop only at night, and so I favor harvesting Cannabis in the depth of the night until first light to minimize terpene loss.
Live material
The main limitations of working with live material is getting direct access to the plants and an extremely small window of opportunity. The processing of the plants must be done onsite and at the peak of the flowering cycle which limits the number of plants that can be washed and the number of farms one can visit at harvest time. Furthermore, a nocturnal harvest done to collect live resin entails immediate processing which while further limiting the work hours nonetheless has the advantage of offering the cold conditions mandatory to optimal handling of live resin.
A plant freshly cut will bleed chlorophyll when washed in a vortex of water. It will be slight at first but will increase with each successive wash. The separation of chlorophyll contaminants and resin over the mesh of the bags with a spray of water is a simple matter, a problem easy to remedy at first but it becomes harder, takes longer and uses more water the more you wash the material.
The focus of collecting resin in living plants is about maximizing the full terpene profile of the plant at the peak of its expression. Dried trichome heads will hold the same amount and quality of formed resin as live resin heads but not the same amount of terpenes. This difference in terpene content is so influential that the end results will be two very different types of Cannabis concentrate.
Fresh Frozen Material
Freezing plants at harvest is the perfect solution to the main limitation that working live material engenders.
While the pre-freezing processing must be done at night on site only a light trimming of the flowers is necessary before storing filled containers in a refrigerated mobile unit, the number of plants harvested per night is only limited by the workforce available and the freezer capacity.
There is an important factor to consider when freezing live plant material, a natural process known as ice nucleation.
Life plants are made up of 80% water. Ice has a volume 10% superior to water. The transformation of water into the crystalline form of ice literally explodes the plant material from the inside out at the cellular level. The cell walls of the plant are pierced by the formation of the denser mass of sharp crystals; the chloroplast’s (the chlorophyll vein-like network of the plant), ability to contain the plant material in the trichome head is compromised. The chlorophyll will become a major problem as soon as the inside of the plant material starts melting.
The simplest solution to the problem is to work as fast as possible in very cold conditions to collect the resin heads before the inside of the plant starts melting. The temperature of the washing room should to be in the mid-40º F; the washer should be filled with water and ice prior to use to avoid resin sticking to the walls of the machine and the spinning element during processing. All water used should be in the low-30º F and as such well water, or spring water will do fine in the winter in mountainous regions but a water chiller unit is highly recommended, pumping water out of a large container filled with ice is a simple and economical way to approach the problem as well.
Ice nucleation was a major obstacle to my approach to ice water sieving when I was using a plastic washer; a dozen washes, each one with an increasing length of agitation time to dislodge the resin heads by their level of maturity was not a viable option. The plant material would start melting by the third or fourth wash and the leaked chlorophyll was impossible to separate from the resin unlike live plant material that has not been frozen.
After a few negative experiences, I was a pretty virulent detractor of fresh frozen material until last year when I brought my stainless-steel machines to a farm in Humboldt and worked with live and fresh frozen material in very cold conditions.
Ice water sieving live and fresh frozen material both require speed, cold temperatures and the same fine tuning to the process of harvesting the different level of resin maturity. A longer/harder agitation of the plant material to collect half a dozen wider dimensions of ripeness instead of the dozen-plus I usually seek when working with dried and cured material.
The specific and optimal processing conditions being similar it became quickly apparent that live material bleeds chlorophyll like a fresh wound would blood and that frozen material does not, the wound being cauterized by the ice formation.
While ice nucleation is a serious handicap to take into consideration when processing frozen material, it is only necessary to work within specific conditions and with efficiently adapted tools to transform the only handicap to freezing cannabis plants into a solid advantage, no chlorophyll until the inside of the plants melt.
Dried/Cured Material
Curing is technically drying the moisture out of plant material as is done with lavender, thyme, rosemary, sage, bay leaves, tea, tobacco, etc. The extreme volatility of terpenes makes drying and curing spices and other aromatic plants a problematic process. With Cannabis and the amount of terpenoids inherent in each of its terpenes profiles it becomes an art form.
The drying/curing should be a slow process spanning a three-to-nine-month period for 80% of the plant’s water content to not only evaporate to 8% to 10% humidity content recommended for smoking but more importantly to allow for the longer transformation of the plant’s chlorophyll into sugar which offers a smoother smoke without any “green” undertone flavor.
There is an inevitable huge loss of terpenes happening in the first week of drying before stabilization occurs and the polymerization process takes place. The “chemical reaction in which two or more molecules combine to form larger molecules that contain repeating structural units”. (https://www.merriam-webster.com/dictionary/polymerization) The polymerization literally creates a new terpene profile which is vastly different from the profile of live plants or the flowers dried for just a few days.
It could be assumed that a severe loss of terpenes would diminish the psychoactive and medicinal values of dried and cured flowers/resin and while it may well be the case for certain cultivars, there are too many exceptions to make it a rule. The live resin of the unreleased Pinot Noir from Aficionado Seeds, for example, is like a field of wildflowers with a hint of lavender, and while it is a very appealing floral profile the strong chocolate flavor of the cured resin was an intense love at first smell, powerful and addictive.
Live and cured are two pinnacles of a different expression of the psychoactive and medicinal potential of the Cannabis plant, the terpenes are crucial to the overall quality of the resin, but the quantity of terpenes is not the sole factor to consider, the uniqueness and attractiveness of the terpene profile is the ultimate attribute to quality.
Reading the Material
The more knowledgeable one is about the material to be processed, the better the methodology can be fine-tuned to the specific characteristics of the plant, live, frozen, dried, trim, nugs, flowers, type of cultivar, etc.
Please note: we are not judging quality but material physiognomy (outward appearance) in order to optimize our process.
A flower, for instance, will take longer to rehydrate than sugar trims, an Indica dominant hybrid like Girl Scout Cookies with a strong leaf structure can be agitated more forcefully than a fragile Haze without being damaged, a live plant will require a colder working environment and being structurally stronger than rehydrated material will endure a stronger agitation., etc.
Optimizing agitation for a mini washing machine:
The ratio of water, ice, leaf material and the length of the wash cycle are the deciding factors in the agitation process with a mini-washer.
- Water is the receptacle and the power that detaches the resin heads from their stalks. As a principle, the more water and the less material and ice there is, the more powerful and effective the courant of the water vortex will be.
- Ice gives the ability to work in a cold environment but it the nemesis of the methodology and should be used sparingly. Too much ice will grind the leaf matter creating contaminants and weaken the power of the vortex.
- The material requires space for agitation, the more space, the more effective the process, the less material, the more powerful the water courant and the less likelihood that the resin will remain in a mass of floating material that is too dense for an effective sieving process to occur.
- I recommend working with approximately 200 to 300 grams at a time, less when doing live resin.
“Less is more and bigger is better” as it is with dry sieving.
Stainless Steel Agitator:
A conventional washing machine is constrained by a cycle that uses a constant force, and so the strength of the agitation is defined by the length of the wash cycle and not by the force applied by the current of water. Furthermore, the force of the vortex is weakened the more material and ice is added to the water. The Agitator gives me the option to circumvent this limitation and fine-tune the power of the vortex and separate with greater accuracy the different dimensions of ripeness. The ratio of plant material in the machine is no longer constrained by the potential loss of puissance of the vortex, I can work with half a pound of material in 6 gallons of water, with six-to-seven pounds in twenty-five gallons of water and anything in between.
I work with a constant 5-to-7-minute-long wash cycle and start with a revolution of 200-to-250 rpm depending on the structure of the material, and work the force of my agitation by increments of 30-to-50 rpm per wash.
There are otherwise minimal variations in the actual methodology between the mini-washer and the Agitator; the difference lays in the capacity, efficiency and total mastery of the process. These alterations to the process will be mentioned.
The Ice Water Sieving Process
The Ice Sandwich:
Complete rehydration of the plant material is required at the beginning of the process to avoid leaf matter breakage and contamination. I initially make an ice “sandwich” to create a cold working environment, and to keep all my material submerged underwater to absorb the water evenly. I place a little ice first to avoid resin sticking to the bottom of the machine and jamming the turning plate. It is not pleasant to have to release the plate manually, in ice water, even with a gloved hand.
The top layer of ice keeps the trim submerged. However, this requires a disproportionate amount of ice, for that reason the first cycle of the machine will constantly have the potential to grind the material and create contaminants.
Different materials will rehydrate at different rates. The time necessary will be defined by the specific characteristics of the plant matter – trim, nugs (small bottom flowers), flowers, and genetics. The rehydration process takes approximately ten-to-twenty minutes; the best way to assess if the material has been completely rehydrated is by manually checking the suppleness of the material. When the material is sufficiently hydrated, it will bend like a fresh leaf without any breakage, tearing or crunchiness.
Note: The Agitator is loaded the same way however a disproportionate top layer of ice is not necessary, I use a custom-made grill to weigh the material down under water and start working in perfect conditions, with as little ice as possible.
The First Wash:
The ratio of water, to ice and material, is disproportionate during the first run. The excess ice will grind the leaf matter. To avoid this challenge a very short cycle is required which essentially fits into our approach of collecting the different dimensions of ripeness – only a small shake is necessary for the ripest fruits to fall.
I stop my first cycle after only a few seconds, as soon as the upper layer of ice cubes is sucked into the vortex with the material. The sound of the ice is the best guide. The grinding sound is unmistakable, a deep and unpleasant “grrrrr” noise that indicates, “Stop the cycle!” as soon as you hear it.
Sieving/Cleaning the Resin Collected in the Bags:
The stacked buckets holding my sieving bags are supported by a metal grille placed over a large plastic storage container that allows gravity and water to flow freely through the bags and into the storage container, offering the first natural separation in the sieving process.
The color of the water varies from fluorescent green to a dark shade of red and purple depending on the coloration of the plant. The water should be cloudy with resin heads but not muddy green from ground leaf matter.
Rinse the 190-bag lightly with the sprayer set on “Shower”
There is often a lot of leaf matter in the bag which happens most frequently with small leaf material (sugar trim) and is due to the need to maximize the exhaust flow; merely put the collected leaf matter back into the machine and clean the bag thoroughly with alcohol if there is any stickiness. The cleanliness of the meshes defines the amount of trichomes that can pass through the sieve into the Collection Bags.
Put the bucket frame holding the 190-micron bag on a clean surface. If dirt or other contaminants stick to the bottom of the bag, it will end up later in the 160-micron bag that is stacked under it.
Rinse the 160-micron bag thoroughly by moving the resin around as widely as possible across your sieving surface to maximize the separation. It is crucial to avoid cleaning the resin of the 160-micron bag over the 45-micron bag to prevent unnecessary contamination.
I do not collect the resin from the 160-micron at every wash for the simple reason that there is often little enough of it. I simply rinse and clean the 160-micron at every wash until the last. Otherwise, l collect the resin from the 160-micron solely if there is just too much of it, and it hampers the flow of water and by doing so captures too much of the smaller micron resin heads in its mass.
Put the bucket holding the bag on a clean surface and top it with bucket holding the catch bag so that any airborne contaminants will not land in the 160-micron bag.
The 45-micron bag is obviously the most important. The first wash will not be the cleanest or offer the most return, as we have hardly shaken the material/tree, and at this stage are collecting only the ripest trichomes, which will have the darkest coloration.
Rinse the resin thoroughly, moving it across the sieving surface pointing the spray under the mass of resin. When powerfully rinsing the 45-micron bag, a foam will form over the resin. The bubbles hold all the contaminants and can easily be pushed through the sieving surface of the bag.
Rinse until the color of the foam is exactly the same color as the resin and gently push the resin towards the middle of the bag in as small a puddle as possible to facilitate collecting.
Gathering the Sieved Resin to Dry
Drying is the most delicate and challenging part of the ice water sieving process. It has to be perfectly executed so that there is a minimum loss of terpenes and no humidity left that could later degrade the resin stability and quality.
Part 5 of this workshop will be dedicated to drying in a room, with a freeze dryer and a vac oven.
Preparing the Resin for Drying in a Room
The drying room needs a stable humidity level of 35% and temperature at 55°F. It is not recommended to keep entering the drying room after every wash, the stability of the room will be compromised. I recommend the use of a fridge to store the patties until all the washes have been completed, and then moving all the washed resin in one visit to the drying room.
- Squeeze water very lightly out of the sieving bag with your hands before placing the bag between two clean towels to absorb as much of the remaining excess water as possible without any pressure applied. It is important to absorb as much water as possible prior to drying to shorten the process.
- Stretch the bag carefully across a Frisbee or round plate to work over a large Pyrex dish with a 25-micron sieve sheet inside. There are always jumpers.
- Scrape the resin with a very dull butter knife from the 45-micron bag onto the 25-micron sieve sheet in the Pyrex dish. Place the folded 25-micron pad holding the resin loosely in a small towel and store in a fridge.
Drying with a Freeze Dryer
The collected resin has to be shaped into equally thin patties, each one, while being a different size, needs to hold approximately the same amount of water in its mass to dry evenly.
- Do not squeeze water out of the sieving bag before stretching the bag carefully across a Frisbee/plate and over a large Pyrex dish containing a silicone pad covered by a 25-micron sieve sheet. A small silicone mold can also be used.
- Scrape the resin with a very dull butter knife from the 45-micron bag onto the 25-micron sieve sheet in the Pyrex dish. Shape the resin into thin patties applying as little force as possible, place the silicone and 25-micron sheet on the grill shelving in a freezer. Once the patties are frozen, place them in order sieved into a larger 25-micron sheet for easier storage until there are enough patties to fill the freeze dryer.
The Second Wash:
The excess ice from the first wash will have melted to a large degree by the time you have filled the machine with water for the second wash; the water ratio, ice, and trim will not yet be perfect, but the grinding power of the ice will be significantly diminished. The sound of the ice will be your guide again; the sound should be more musical but still a little menacing. The second wash should be approximately 2 minutes long.
The color of the water will be slightly lighter; the water should be cloudy with resin heads but not muddy green from ground leaf matter.
Note: The Agitator will need to be filled with ice before adding water with each wash.
Follow the step described in the First Wash for cleaning and collecting the resin of the different bags.
Gathering the sieved resin to dry will be similar every time, please note that keeping the washes separated and in order is important, everyone is a different dimension of ripeness, unique in itself.
The Third Wash:
The machine will have almost no ice left by the third wash. It is recommended to add a small amount of ice before filling the machine with water for a 3rd time, so that little ice remains once the machine is full. The sound of the ice will be a gentle clinking against the wall of the machine by now. As long as a few ice cubes are floating, the water is ice cold, from that point forward add only a handful of ice cubes at a time.
The third wash should be approximately 3-to-4 minutes long.
Follow the step described in the First Wash for cleaning and collecting the resin from the different bags.
Gathering the sieved resin to dry will be the same process each time.
The Fourth to the Last Wash:
Add the ice before filling the machine, so that little ice remains once the machine is filled as was done previously.
Every wash should be longer than the preceding one by a minute or two.
Follow the steps described in the first wash for cleaning and collecting the resin of the different bags.
Gathering the sieved resin to dry will be similar each time. Keep the washes separated and in order.
Collect the resin from the 160-micron bag on the last wash. It is not necessary to collect the 160-micron at every wash; there is usually too little resin to easily clean to waste time collecting. Collect the resin in the 160 solely if there is enough to hamper the flow of the water passing through the sieving bags.
Cleaning the Machine:
Empty the machine by hand, take the moving parts off and rinse with water.
Clean all your bags and tools thoroughly using ethanol alcohol.
Run the machine through a short cycle using a mixture of water and isopropyl alcohol to sanitize.
Recycle the used trim to be processed with ethanol or used as compost in a local garden.
Part 5 will be dedicated to the different drying process and tools available.
Full videos of the washing process can be found in the DIY section of my YouTube page at www.youtube.com/c/frenchycannoli.
Frenchy Cannoli is a consultant, educator, and writer in the Cannabis industry with special focus on hash making using traditional methods. Frenchy can be reached through his website at: www.frenchycannoli.com or seen on Instagram @frenchycannoli.
Originally published in Weed World Magazine issue 140