After placing first overall at the 2010 High Times Cannabis Cup, we were intrigued by the then-new strain from Barney's Farm, 'Tangerine Dream'.
Having grown out numerous BF strains (Vanilla Kush, Red Dragon, Acapulco Gold, Blue Cheese – to name a few) with impressive results, we had high hopes and expectations for this one to match the impressive genetics which were previously proven by this ‘big 2’ breeding company. This also happened to be my first adventure in hydroponic style growing, after doing some in-depth research with waterfarm growing. I’m an indoor tent grower and, like many private ‘closet growers’, my space is extremely limited – no room to keep mother plants or maintain a cloning cycle. For this reason, we grow exclusively from seed. Although we’ve only grown out one seed of the TD, comparing our results to other growers (online) during that time proved and disproved a few claims made regarding this sativa dominant selection.
Setup
Having decided to focus on a single plant this round, my smaller single-sized grow tent (4’x4’x7′) was used with our 400 watt MH light and open-style batwing reflector. I figured with the small tent it would be easier to control temps, with the smaller light creating less heat, and the reflective inner-walls of the tent would be closer to the plant in order to allow the low light-wattage to be more beneficial. The tent had a small 75w inline fan blowing fresh air into the bottom corner using a short run of ducting – this allowed me to keep fresh air circulating from the bottom. At the top of the tent, in the corner, I strapped a carbon-filter in which has its own fan attached to it to draw in the warm and smelly air before filtering and exhausting it out the top of the tent. For those unfamiliar with the waterfarm, it’s basically a simple drip/circulate all-in-one hydroponic grow system consisting of one lower-profile (2 gal) square bucket suspended inside a larger square bucket (4 gal). The 2 gal bucket has small holes in the bottom and is filled with inert hydroton or clay-pellets (I use hydro-corn actually), the larger 4 gal bucket serves as the unit’s reservoir and is filled with your water/nutrient solution up to the bottom of the smaller bucket. A 1/2″ plastic tube runs through the top bucket near the corner, down to the bottom of the reservoir in which an air-tube is installed with a pump to push air down and force the water up through another plastic console which exits a round ‘drip-ring’ at the surface of the hydroton. These units allow small-growers to grow hydroponically and still only have a few plants at a time.
Germination – Seedling
We placed two seeds in wet paper-towel with the intention to use the healthiest looking one to germinate. After two days, one seed had germinated and was almost shedding its shell while the other looked dark and unviable. The germ’d seed was then placed carefully into the hydroton. Some research online at the time revealed that we weren’t alone having slight germination problems, as many people were having very low germination rates with the initial release of this strain (early 2011). Many users actually gave up or abandoned attempts at growing TD initially due to poor germination rates compared to other plants being grown together with them.
This was our first time growing using a hydroponics setup and the speed of initial growth just using CFL lighting was impressive. Within a few days, our seedling already had a first set of leaves and a second set on its way. Since this was the first time using this waterfarm, the hydroton caused some small issues with rusty and twisty leaves, but these initial leaves were soon followed by healthy foliage.
Veg Stage
The vegetative stage proved to be an unexpected marathon…after a bit of a drawn-out and slowish start, things started to take off nicely after about the third week as the roots finally made it through the hydroton bucket into the reservoir below. No deficiencies could be seen at this point, and the plant-growth was picking up speed daily. Approximately 51 days from seed, the TD was finally ready to start being spread out on a screen. Many strong tops had already developed into a decently even canopy, but it was becoming obvious that if sufficient support was not given, it would definitely become a big problem vertically if I didn’t start moving more branches out to the edges of the tent. My first home-made screen was built from short lengths of narrow wood and a small amount of plastic winter fencing which is abundant in our hardware stores. It wasn’t a pretty thing to behold – stapled together to fit the tent size, but it seemed to do the trick. The 2 inch square holes in the plastic fencing were cut out to twice the size – perfect for training branches.The following 13 days up until flower included constant moving of branches from the center out to the sides and corners of the tent. After slightly over two months, it was finally time to switch gears and shift into the flowering stage. Little did I know what was to come…
Flowering Stage
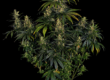
After an unusually long (for me) vegetative stage, this plant was finally ready to start flowering. Having gauged when to induce flowering according to how much space it had taken up on the screen, it appeared that I would have plenty of vertical and horizontal space for the flowering cycle to complete. The first 3 – 4 weeks of flowering showed quite a lot of stretching as this plant quickly filled the screen and the overall space in my small tent. From that, the first week was spent mostly spreading the canopy out by tucking back and moving branches to outer squares of the screen, but even though I tried to spread the growth out to the corners of the screen and tent, a large number of branches continued to climb in height and would ultimately need to be tied up to keep from flopping over. We used lengths of the green plant-twist-tie wire to hold up the large stalks and attached them to the reflector above, which we found to work quite well. During week 3, I also did extensive super-cropping (twisting the stems of the main tops of each branch) about 6-8 inches below the tops – I’ve found that this both controls the stretching during this stage and helps build denser, fuller buds. It was around this time (week 5 of flowering) that I realized this plant was not really ‘slowing down’ after the initial stretch, and continued to get bigger and bigger. Many times I would have to give it a ‘double-take’ and wonder how the single waterfarm container could support such a large, monstrous plant. Things continued to thicken and grow for another 7 weeks (yes we flowered this plant for almost 14 weeks) before I started flushing her for the last few weeks. The thicker leaves we saw earlier on during veg appeared to thin out and large, long, sativa-like leaves began to develop; after sharing some grow pictures online, we discovered other people noticed the same trait with early indica traits later developing into more sativa-like characteristics. We had quite the jungle forming in our small tent, with tall branches drooping and flopping about everywhere as I scrambled to keep them secured as well as I could. Nearing the 14 week mark of flower, I knew my reservoir could not be faring too well with the inevitably large amount of roots packed in there. Luckily things were looking ready to chop, as there was enough amber trich’s showing to give us a decent 50/50 balance between milky and amber. Time to bring down the giant and start trimming!
Harvest
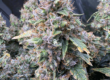
Looking back at the time we spent harvesting this single-plant, it was a very large job for a few people but quite rewarding! As ropey as the buds were, they were impressively thick and heavy but still loose and fluffy at the same time. The largest buds had quite a lot of foxtailing where they would shoot out separate thinner buds from the main thick buds instead of ‘growing into each other’ to form dense flowers like indica-dominant strains tend to do. This made it more difficult to sufficiently manicure the buds closely, but I found that trimming a sativa plant requires a bit of a different approach, as you keep much more ‘leafy-flower’, so it’s easy to get carried away and trim more than necessary. We made out fairly well overall and ended up with around 15 ounces of dried bud, with another ounce or so in popcorn buds from the lower parts of the plant (which ended up mostly smokable as well). Far and well beyond our expectations.
Smoke Report
The description on BF’s site for TD describes it as a ‘pungent, fruity-smelling flower with a concentrated, sweet, tangy, citrus-like flavor’. We definitely noticed the pleasant fragrance of the cured bud, and it was refreshing to grind up for smoking. The taste was also very nice – fruity notes and a somewhat pleasant, smooth tasting smoke, especially in the vaporizer. Very ‘ropey’ sativa buds, not thick and dense like most of the indica-dominant strains we’re so used to. As expected in a sativa-dominant, the effect from this plant was quite uplifting and energetic – thanks to the Neville’s Haze in this cross. This is definitely a daytime smoking strain, able to keep you going for hours with a gentle, gradual body-stone near the end. We also had amazing results mixing this one with Vanilla Kush, making for a unique, flavorful, euphoric experience!
Overview
After completing this grow, I’m convinced that Tangerine Dream is likely not the most ‘ideal’ strain to grow indoors. With the waterfarm especially, expanded growth and stretching at the slower rate at which it grows appears to be grossly underestimated by Barney’s, who quote it as taking 70 days to flower which is stated as being impressive for a sativa-dominant strain. Obvious sativa traits, although not initially apparent, show themselves more later in the flowering stage of growth and make for an extremely long grow time both in veg and flowering stages. The typical narrow, massive, thinning, sativa leaves appear late in the grow from fatter, thicker, more indica-like leaves during veg, giving a deceptive indication of more indica presence than there actually is. Again, having only grown a single plant, I can only critique what I ended up with, but online grows point to much the same results. Indoors, plants of this size end up looking like they’re being ‘held back’ from their potential – I can’t image what results would be been realized if this plant was out in the sun! I would highly recommend this strain to outdoor growers for that reason – truly a fruity monster!
– Dayzt
For the complete grow journal and tons of pics within:
http://www.rollitup.org/grow-journals/418227-barneys-farm-tangerine-dream-waterfarm.html
For a few youtube vids, my account name there is ‘canadagrows’ – here’s the links:
http://youtu.be/Go04L9fawzU http://youtu.be/DaSHkfspoBM
Originally published in Weed World Magazine Issue 106